How to use transparent videos on the web in 2025

Have you ever wondered why you don’t see videos with transparency on the web, let’s say, all the time?
Just imagine all the cool things you could do with it:
- Show a video on top of your HTML contents
- Show a video on top of another video
- Play a video that looks like it’s changing shape
- Show a video that just ever so slightly overlaps the body text on a page, breaking the boxy look
SERIES This post is a part of our series called The Big Guide to Transparent Backgrounds in videos and images
You may have even tried a Youtube embed or a video tag and found that, nope, that didn’t work either. And how do you even make a transparent video - a video with an alpha channel - in the first place? And if you do find out, how do you double-check that it is, in fact, transparent? It’s not a friendly environment. It’s as if someone decided a long ago that we won’t need this. But we do.
And it’s technically possible. On top of that, the results look great and will set your project apart from those flat, boxy videos everyone else has.
Here’s what we’ll go through:
Let's get started!
What’s an example of alpha transparency on the web?
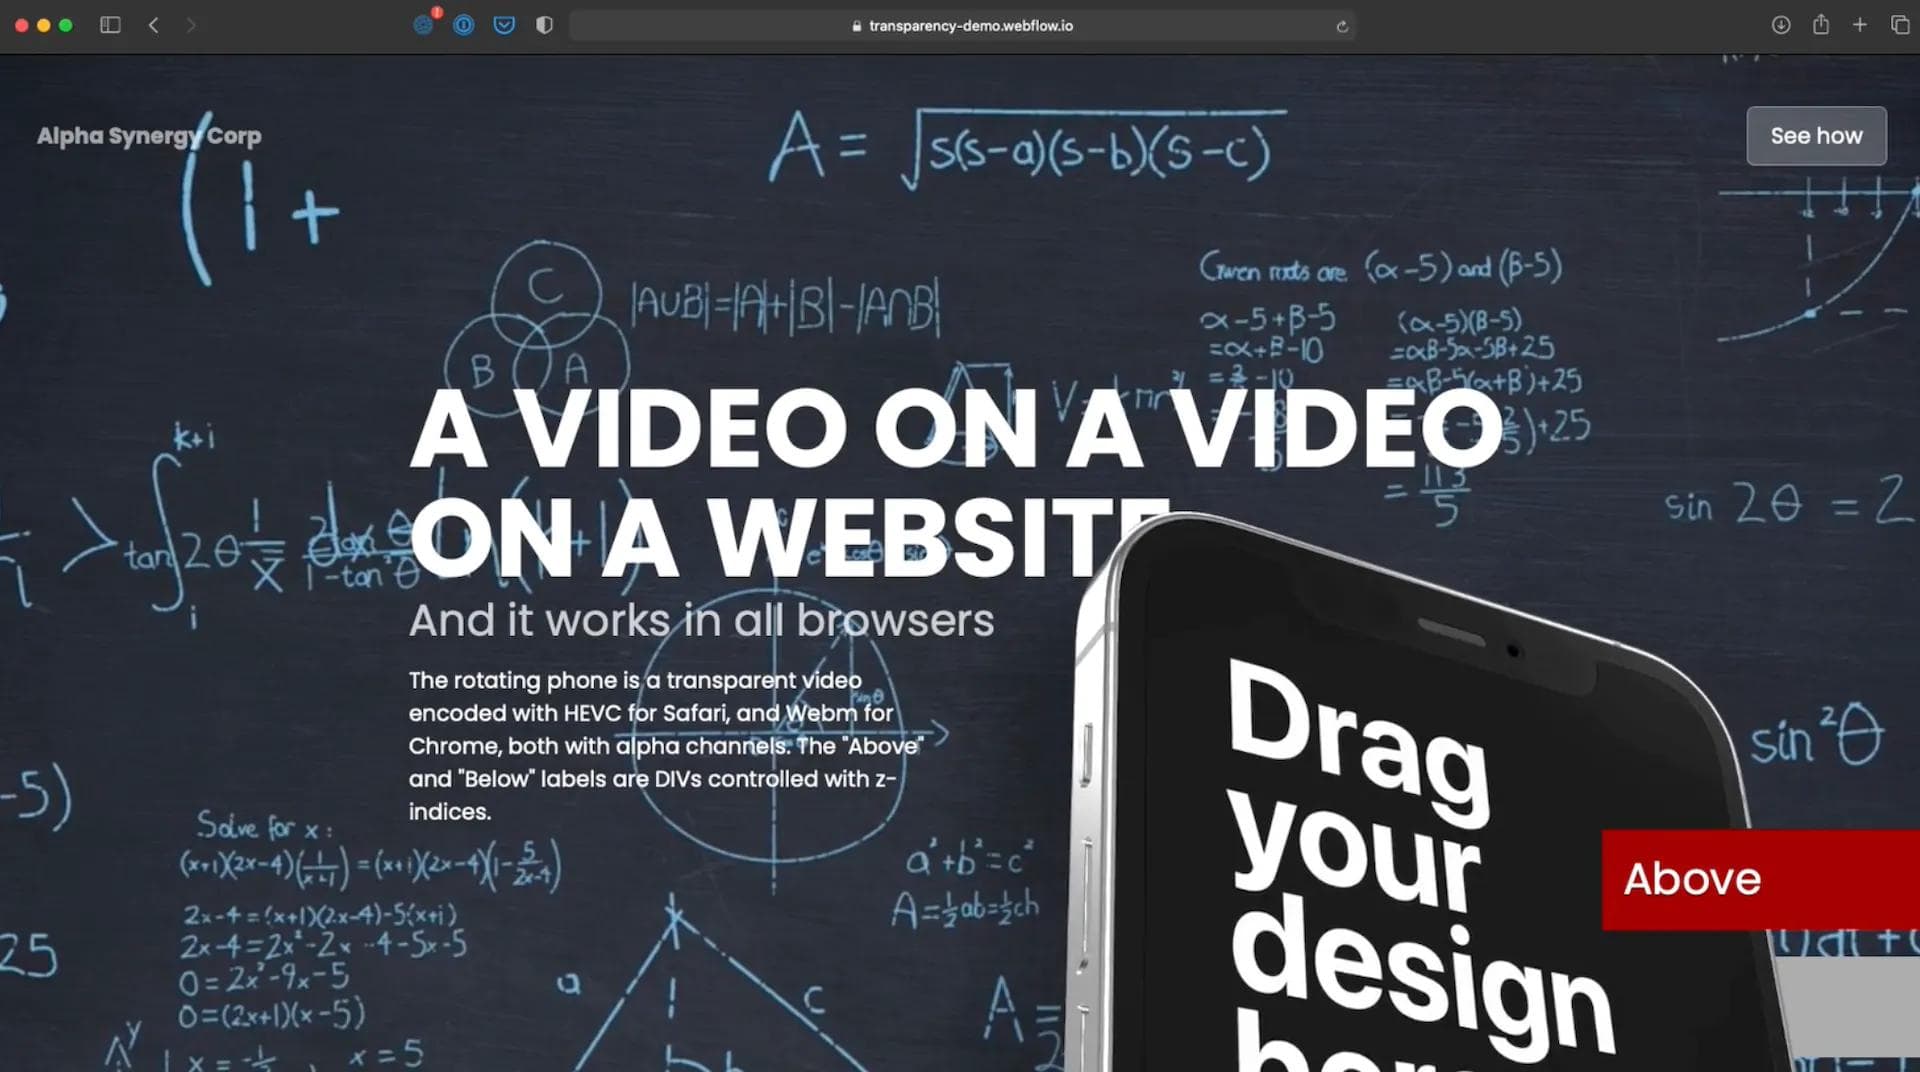
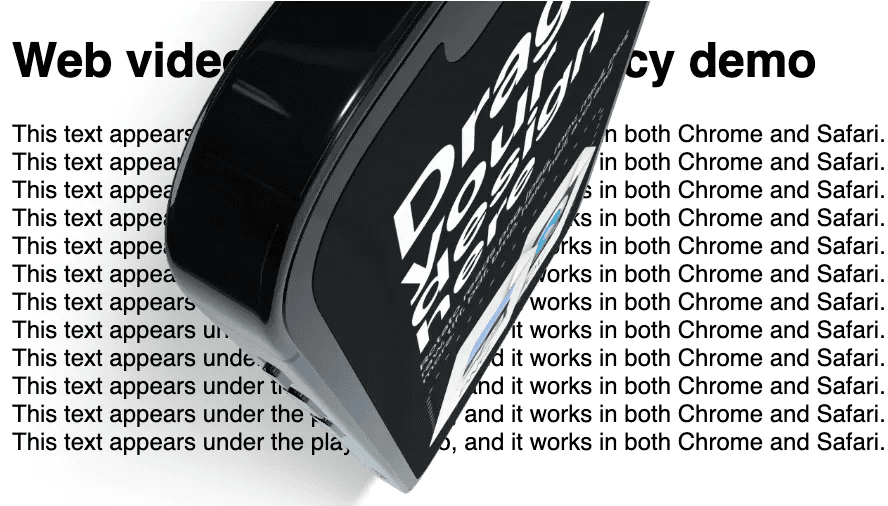
Glad you asked. Here’s an example we put together. See the live site here and the Webflow project here.
Here’s a more straightforward example (demo page) (codePen)
Why isn’t transparency used more?
Maybe because it’s just not supported — in an obvious way. In this post, I’ll show you how to do this, but also how to cheat and make a shortcut using smoke and mirrors, making your life slightly simpler in some cases.
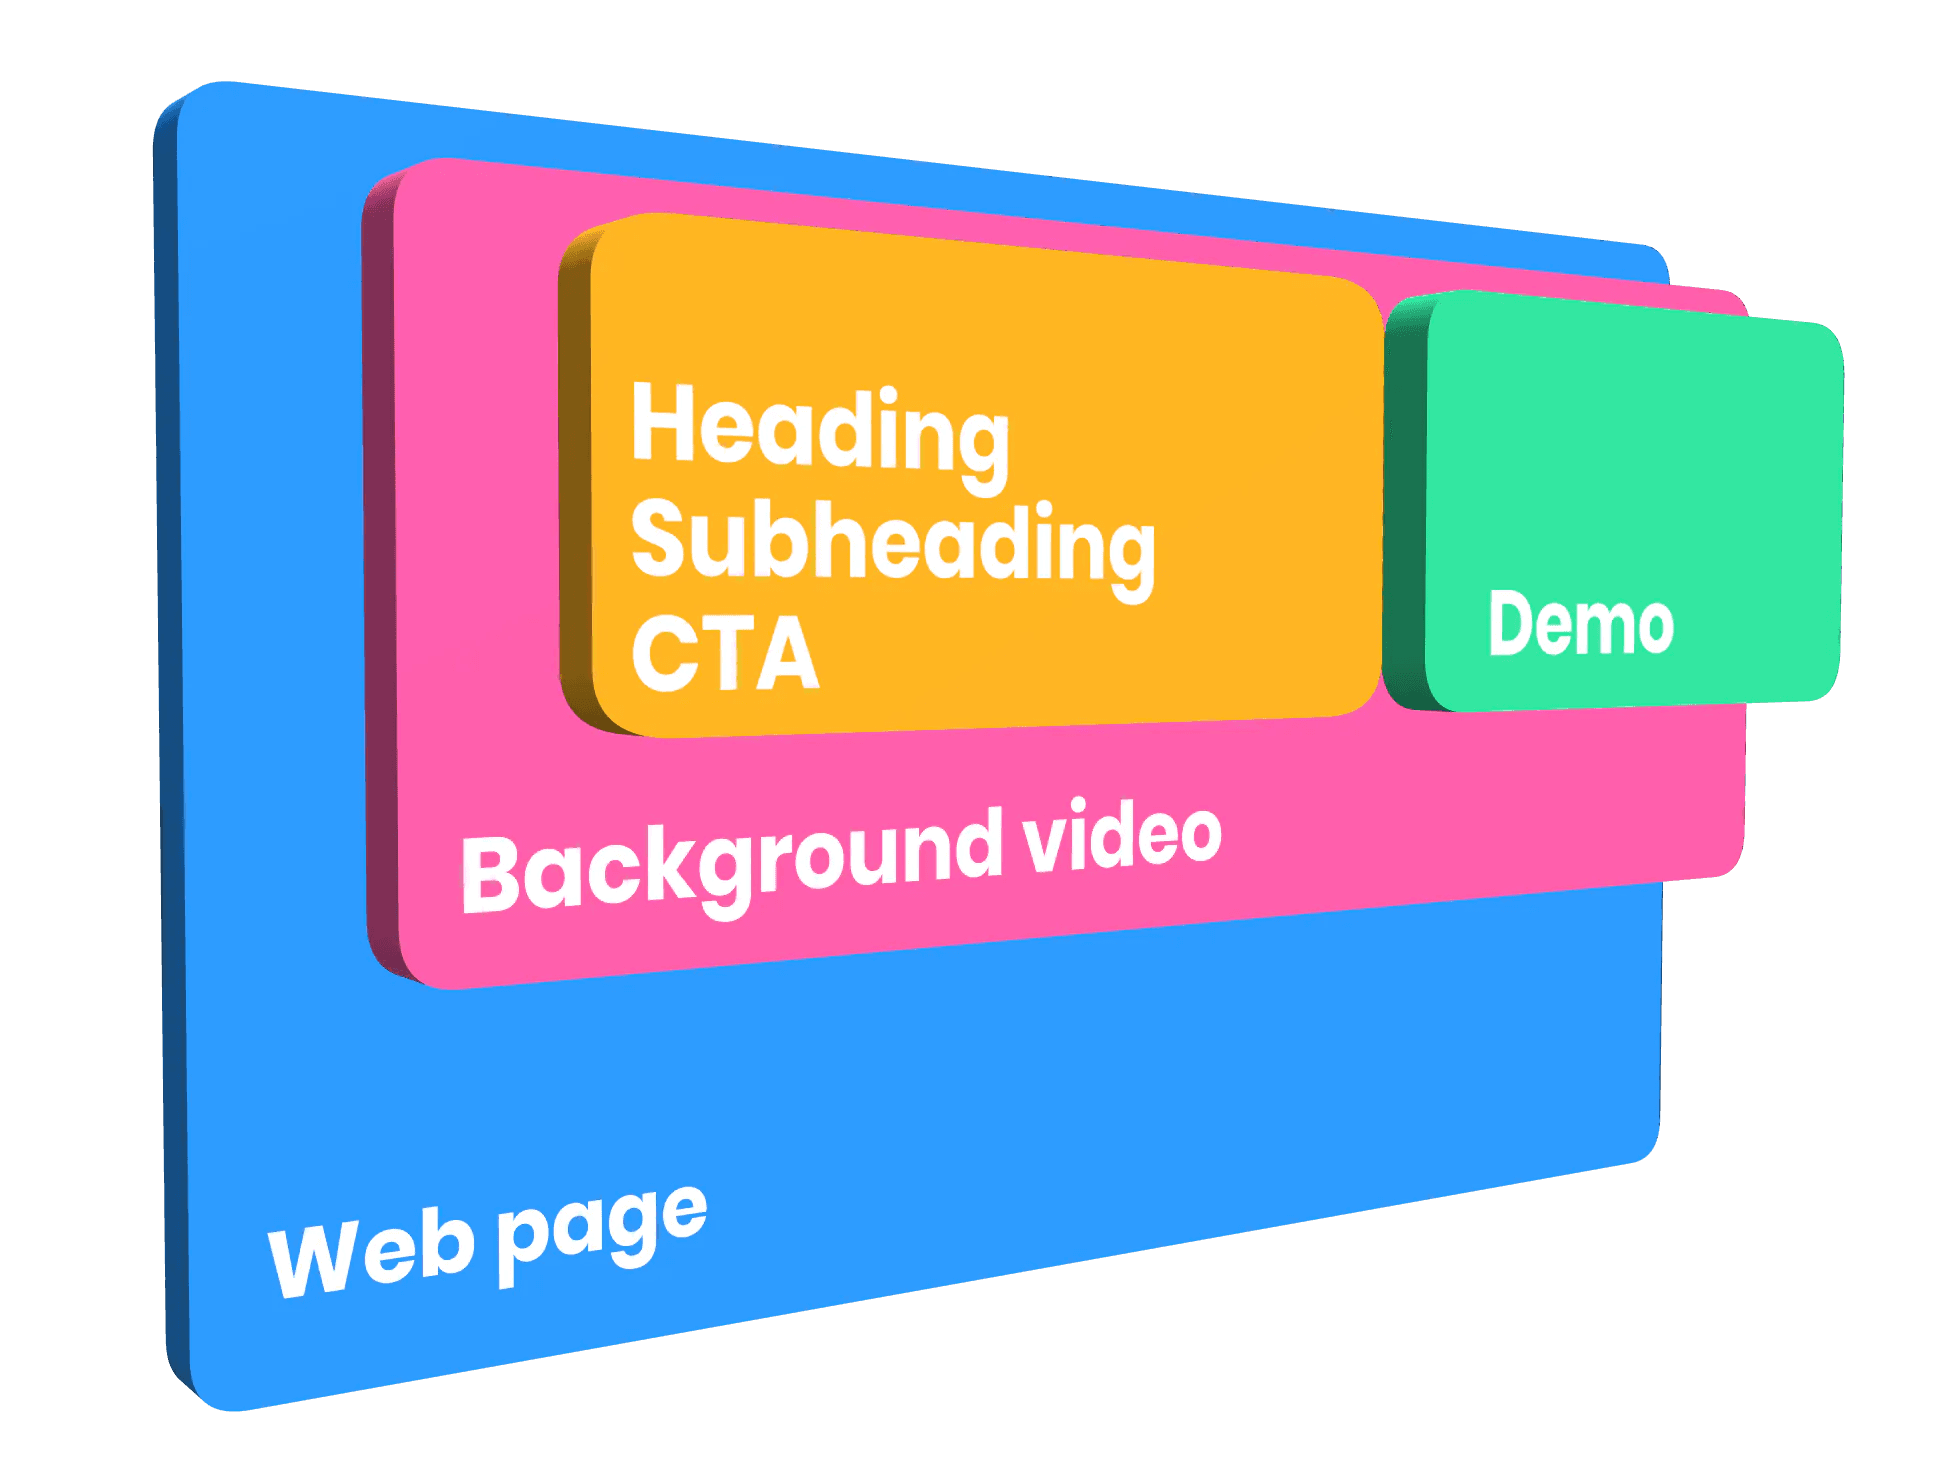
Let’s get to it. First, let’s agree on a few terms: Foreground, Video, Web page contents. You can imagine a web page like a stack of layers on top of each other:

So, the blue box is your website, the red box is your transparent video, and the green box is your optional foreground, which might be a video.
Under your video, the big question that will determine our path as we continue our journey is, what do you want to use as a background?
Your answer decides if we can go the easy way or the slightly more brutal way. Let’s start with the easy way.
The easy way
Here’s an example.
See how they have two videos going on here? On the top layer, there’s a video showing their product. The elements shrink and grow like it’s no big deal. And to top it off, they even have a video running below the video. Here’s what that would look like
How did they do that? Well, they didn’t. Here’s what’s going on:

What we see here is a clever workaround. The Typeform designers combined the UI video on top of the background video into one video. Then, they matched the background color with the color under the text and used the new, combined video as the background element. No transparency is needed.
Here’s the video they used:
So that’s one workaround - smoke and mirrors. It works because the background is abstract and nicely blends with the site’s background.
The big question is now: What if the background is not abstract? What if you want to play your video on top of rendered HTML, like in the first example? For that, we need a bigger knife. We need the real thing.
The real way
This shouldn’t be a problem. We’ve had transparent video formats for years. So why isn’t this simple? Long legal story short: There are two significant browsers from two big companies. Google and Chrome think open source is fantastic, so they made their own open-source format. Apple and Safari want to stick to the MPEG standard, so they support HEVC (H265).
The results?
- Safari supports HEVC with alpha, and Chrome does not.
- Chrome supports VP9 with alpha, and Safari does not.
Now what? You guessed it: We’ll have to provide both formats and let each browser choose.
As of Safari 15 in macOS Big Sur, Safari has VP9/webm support. But not for transparency.
Converting your videos
The first thing you need is a video with an alpha channel. (If you’re using Rotato, here’s how to get one)
What to export
Before you do anything, make sure your video isn’t too big, as you’ll be playing it on the web directly. In Rotato, 720p is often big enough for a short video.
- First, export your HEVC with alpha, and call it
**movie-hevc.mov**. This file will be our Safari-ready movie. - If your video editing app supports VP9 with transparency, choose that. If it doesn’t support it directly, like Rotato, go for the HEVC With Alpha, then convert to WebM, as described below.
We now have 50% of the videos we need, so we’re halfway there! Next up, we’ll convert that HEVC video to VP9 so Chrome has something to play.
Using Rotato Converter
Here’s some good news for you: We built a small, free tool that converts to both alpha transparency formats in one go! It’s simple enough to download and use, but you can also check out our guide to using Rotato Converter.
Using FFmpeg
If you want to geek out, you can install FFmpeg and do the conversions yourself. Here’s how to do that:
Installing FFmpeg
First, we’ll need an app that can convert between video formats. FFmpeg is free and fast. Install the latest version of FFmpeg here. If you’re not sure how to put FFmpeg in your path, see this video tutorial for an end-to-end tutorial.
It’s a command-line tool, so you’ll need to open Terminal on your Mac. Once there, cd into the folder with the source video.
Converting to WebM with FFmpeg
In Terminal, enter the following command in the folder with your exported videos.
ffmpeg -i "movie-prores.mov" -crf 30 -b:v 0 -c:v libvpx-vp9 movie-webm.webmIf you have an Intel Mac, you will now hear your cooling fans getting to work. It will take a few minutes, depending on how big your video is. There is a lot of math going on here, so grab a coffee and wait. It can easily take 10-15 minutes for a long video.
Converting to HEVC With Alpha using FFmpeg
Note that this may not work on Windows unless you install HEVC/H.265 specific software. MacOS supports this out of the box.
ffmpeg -i your-file.mov -c:v libx265 -preset slow -crf 28 -pix_fmt yuva420p output.mp4Adjusting size, quality and speed
For better quality and bigger file size, decrease the CRF value in the command. Note that a CRF of 28 for MP4 is not exactly the same as 28 for WebM, so experiment a bit to find the perfect match for your situation.
For faster conversion, remove the "-preset slow" part of the command. See all ffmpeg presets here and all WebM options here.
Using the videos on the web
You should now have the two video files you need. It’s time to put them online!
Upload the movies to your web server, and use this code snippet wherever you need your video.
<video width="600" height="100%" autoplay loop muted playsinline>
  <source
    src="https://rotato.netlify.app/alpha-demo/movie-hevc.mov"
    type='video/mp4; codecs="hvc1"'>
  <source
    src="https://rotato.netlify.app/alpha-demo/movie-webm.webm"
    type="video/webm">
</video>
Bonus: using transparent videos in Figma Sites
Yes, you can use transparent videos in Figma Sites!
Note that with both methods, you can only preview your transparent video by previewing your site. They won't play in the editor, but I'm sure Figma is working on that.
Embed
The simplest way to do this in Figma Sites is to add an Embed (click the arrow next to the Make icon in the toolbar), then just paste in the snippet:
<video width="600" height="100%" autoplay loop muted playsinline>
  <source
    src="https://rotato.netlify.app/alpha-demo/movie-hevc.mov"
    type='video/mp4; codecs="hvc1"'>
  <source
    src="https://rotato.netlify.app/alpha-demo/movie-webm.webm"
    type="video/webm">
</video>
Code layer
If you want a full component with UI controls for looping and the two video URLs you can make a code layer with the code below. You can click Make
import React, { useRef, useEffect } from "react";
import { defineProperties } from "figma:react";

export default function TransparentVideo({
  width = "100%",
  height = "100%",
  autoplay = true,
  loop = true,
  muted = true,
  playsinline = true,
  controls = false,
  mp4Src = "https://rotato.netlify.app/alpha-demo/movie-hevc.mov",
  webmSrc = "https://rotato.netlify.app/alpha-demo/movie-webm.webm",
}) {
  const videoRef = useRef<HTMLVideoElement | null>(null);

  useEffect(() => {
    // Ensure video starts playing if autoplay is true
    if (videoRef.current && autoplay) {
      videoRef.current.play().catch(error => {
        console.error("Error attempting to play video:", error);
      });
    }
  }, [autoplay]);

  return (
    <div className="w-full h-full flex items-center justify-center">
      <video
        ref={videoRef}
        width={width}
        height={height}
        autoPlay={autoplay}
        loop={loop}
        muted={muted}
        playsInline={playsinline}
        controls={controls}
        className="max-w-full max-h-full"
        style={{ objectFit: "contain" }}
      >
        {mp4Src && (
          <source
            src={mp4Src}
            type='video/mp4; codecs="hvc1"'
          />
        )}
        {webmSrc && (
          <source
            src={webmSrc}
            type="video/webm"
          />
        )}
        Your browser does not support the video tag or the required video formats for transparency.
      </video>
    </div>
  );
}

defineProperties(TransparentVideo, {
  width: {
    label: "Width",
    type: "string",
    defaultValue: "100%"
  },
  height: {
    label: "Height",
    type: "string",
    defaultValue: "100%"
  },
  autoplay: {
    label: "Auto Play",
    type: "boolean",
    defaultValue: true
  },
  loop: {
    label: "Loop",
    type: "boolean",
    defaultValue: true
  },
  muted: {
    label: "Muted",
    type: "boolean",
    defaultValue: true
  },
  playsinline: {
    label: "Play Inline",
    type: "boolean",
    defaultValue: true
  },
  controls: {
    label: "Show Controls",
    type: "boolean",
    defaultValue: false
  },
  mp4Src: {
    label: "MP4 URL",
    type: "string",
    defaultValue: "https://rotato.netlify.app/alpha-demo/movie-hevc.mov"
  },
  webmSrc: {
    label: "WebM URL",
    type: "string",
    defaultValue: "https://rotato.netlify.app/alpha-demo/movie-webm.webm"
  }
});
Final thoughts
That was a lot! But when you look at it from above, it’s a simple process:
- Create your video with transparency in a video editing program like Premiere, Final Cut or Rotato
- Convert that video to HEVC With Alpha and WebM
- Upload those videos to a web server
- Embed the videos on your website using the video tag with two source children tags.
Now that you know how to remove the boxy look of videos and even show the content below, ample creative space opens up. So get out there and blow everyone’s minds with your alpha channels.
We’d love to hear if this guide was helpful or if you have any comments. We’re constantly improving our guides. So let us know about our guides at rotato. app. We made the 3D illustrations with the excellent Spline tool**, and the example comes from Typeform**.